Contents of Article
- Summary
- What is the Squat Jump (SJ)?
- Application of the Squat Jump
- How do you perform the Squat Jump test?
- How do you calculate your Squat Jump performance?
- How do you score the Squat Jump?
- Considerations for using the Squat Jump
- Is the Squat Jump valid and reliable?
- References
Summary
The squat jump (SJ) is a simple, practical, valid, and very reliable measure of lower-body power. As a consequence, it is no surprise it has become a cornerstone test for many strength and conditioning coaches and sports scientists.
NOTE: The Squat Jump test is not to be confused with the Countermovement Jump (CMJ), Abalakov Jump test, or any of the Jump-and-Reach tests such as the Sargent Jump test, the Vertical Power Jump, or the Vertec Jump test (1).

What is the Squat Jump (SJ) test?
The Squat Jump (SJ) test is typically used to measure an athlete’s explosive lower-body power (i.e. speed-strength ability) (2, 3). It is also less commonly used in conjunction with a CMJ to identify an athlete’s reactive strength capacities during a slow stretch-shortening cycle/low stretch loads (2). This offers novel information as it can be compared with their performance during fast stretch-shortening cycle/high stretch load reactive strength tests such as the Incremental Drop Jump test (2).
There are two common variations of the SJ test:
- Static SJ test
- Dynamic SJ test
The static SJ test requires the athlete to ‘pause’ in a flexed, semi-squat position for several seconds before initiating the upward/concentric phase and jump. The dynamic SJ test, on the other hand, allows the athlete to descend and ascend through the countermovement in one continuous and rapid motion without any stop or pause.
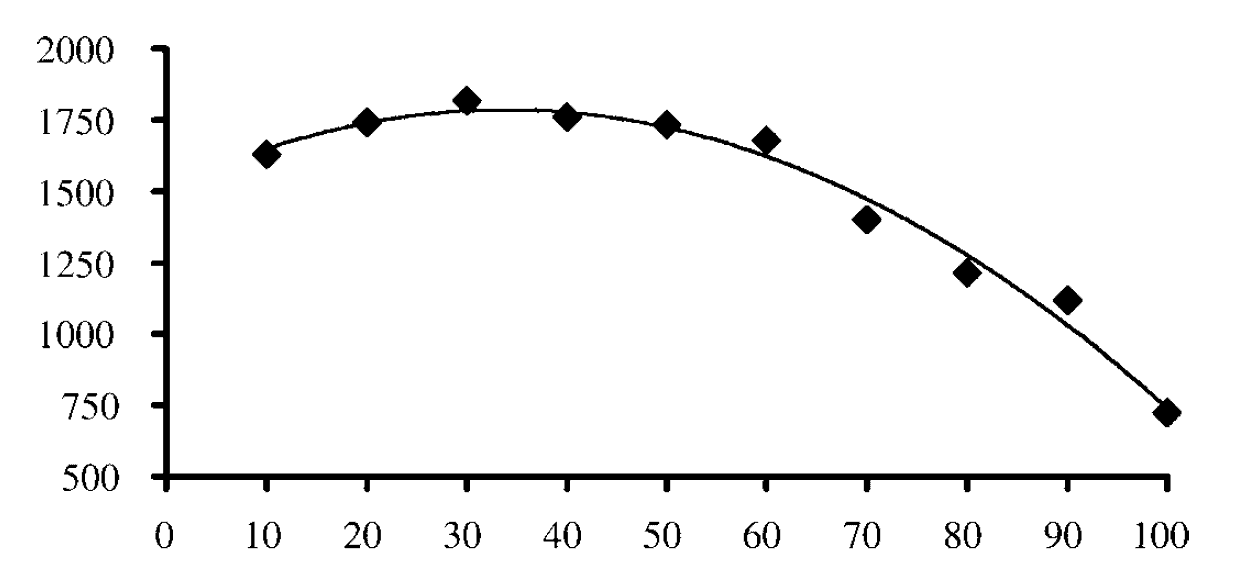
Strength and conditioning coaches will often measure an athlete’s SJ capabilities using various loads in order to identify their power production abilities. For example, a coach may ask the athlete to perform a series of SJs – whether that be static or dynamic – using loads such as 20, 40, and 60 % of the athlete’s back squat 1-repetition maximum (1RM). The athlete’s back squat 1RM is typically used to determine the loads for the SJ purely because of its biomechanical similarities and relationship with back squat strength (4). Using various loads, the coach is able to plot the athlete’s performance on a graph, known as a ‘power-load curve’, and identify at which load the athlete expressed their peak power output (Figure 1).
The classical belief is that prescribing training based on the load the athlete achieved peak power will, therefore, enhance their power production. However, emerging knowledge and research are highlighting that an athlete’s power-load curve changes on a daily basis, and thus this historical method of measuring power via JS in a fitness testing battery is becoming outdated.
In recent years, coaches and researchers are beginning to implement a new method of performance profiling in order to better individualise the athlete’s training programme. This very popular and emerging technique is known as “force-power-velocity profiling” (5).
Application of the Squat Jump
As power is considered to be a critical component in so many sports (6-9), and the SJ is a simple, practical and reliable measure of power output in the lower limbs (3), then it would seem an obvious choice as a tool to measure and monitor performance. To add to this, SJ performance has been linked with sprint speed (10) and relative strength during the 1RM back squat (4).
As a result, the SJ may be an appropriate test for athletes participating in sports that require high levels of lower-body power such as high-, long-, or triple-jump, rugby, basketball, Olympic Weightlifting, and volleyball.
How do you perform the Squat Jump test?
It is important to understand that whenever fitness testing is performed, it must be done in a consistent environment (e.g. facility) so it is protected from varying weather types, and with a dependable surface that is not affected by wet or slippery conditions. If the environment is not consistent, the reliability of repeated tests at later dates can be substantially hindered and result in worthless data.
Required Equipment
Before the start of the test, it is important to ensure you have the following items:
- Reliable and consistent testing facility (e.g. gym or laboratory).
- One of the following: Contact mat, force platform, linear position transducer, high-speed video camera and software, or an infrared platform.
- Performance recording sheet.
- Relevant calculations (see section ‘calculating SJ performance’).
Test Configuration
The test configuration for the SJ will differ depending on what measuring device is being used (e.g. contact mat, force plate, infrared platform, accelerometer, or video camera).
Testing Procedure
Though the SJ test is popular and seems very easy, it is concerning that there appears to be confusion within both the research and practice with regard to testing procedures and how to properly conduct the test. To clarify this, a typical countermovement jump (CMJ) involves the use of the arm swing. A CMJ without the arm swing requires the athlete to place their hands on the hips.
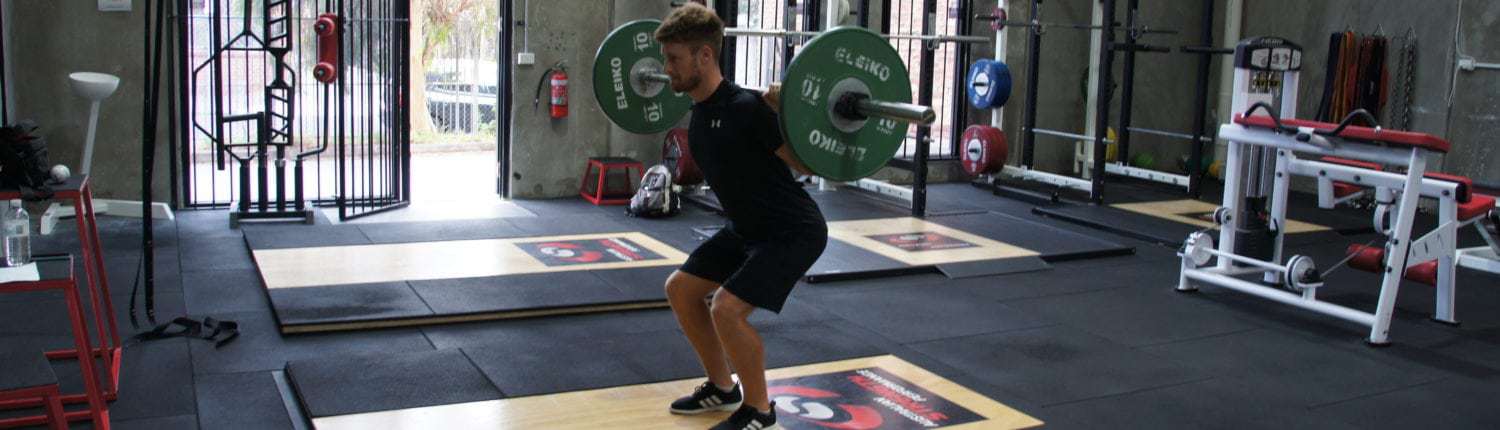
An unloaded SJ requires an athlete to hold a lightweight wooden dowel across their shoulders in a back squat position. A loaded squat jump requires an athlete to hold a loaded or even unloaded barbell – which is still approx. 20kg – across their shoulders in a back squat position. The static SJ, whether that be unloaded or loaded, requires the athlete to sit into a semi-squat position with the dowel or barbell across their shoulders for several seconds before they can perform the upward/concentric phase and jump. The dynamic SJ test, on the other hand, allows the athlete to descend and ascend through the countermovement in one continuous and rapid motion without any stop or pause.
This may seem very simple and almost obvious, but many coaches and studies have performed ‘SJ tests’ where the athletes’ are required to place their hands on their hips (4, 11-13); effectively just performing a CMJ without arm-swing. This may not be a tremendous issue, but it does change the athlete’s kinematics and may, therefore, alter their kinetics. However, whether it has any drastic effect on performance has not been validated by any research. Regardless, distinctions need to be asserted between an SJ, and a CMJ without arms.
Countermovement Depth: This is the depth the athlete will drop to during the short ‘countermovement’ or ‘pre-stretch’ action before they take off. Though there is no universal agreement on which depth is most appropriate, higher jumps and peak power outputs appear to increase with larger countermovement depths (14, 15); however, the data is somewhat inconsistent, and more research is needed. It is therefore recommended the test administrator chooses a particular protocol and sticks to it during future testing sessions.
During flight: During their time spent in the air, it is imperative the athletes maintain extension in the hip, knee, and ankle joints to prevent them from achieving any additional flight time by bending their legs (3, 16).
Jump Displacement: It is also important the athlete not only jumps as high as possible but also attempts to land in the same position as they took off; as jumping forwards, backwards or sideways can affect the test results. To aid this, coaches may often stick tape to the floor as a marker for athletes to take off from and land on.
Once the test configuration has been set up, and the test official(s) and the athlete are ready, then the test can begin.
- With the test apparatus ready (e.g. force platform), the athlete then steps onto the platform with either the dowel or barbell across their shoulders in a back squat position.
- Dynamic SJ test: When instructed by the test administrator, the athlete must simply jump as high as possible and attempt to land in the same location on the platform as they took off from.
- Static SJ test: When instructed by the test administrator, the athlete must lower themselves into a semi-squat position (depth dictated by the test administrator) and pause for 2-3 seconds. After the 2-3 second pause, the athlete is then free to jump explosively as high as possible but must attempt to land in the same location on the platform as they took off from.
- The athlete must perform a minimum of three jumps so that performance averages or their best score can be calculated.
How do you calculate your Squat Jump performance?
In most circumstances, SJ performance is reported as either jump height (cm or inches), or relative peak power output (W·kg-1). Jump height is an estimate of the height change in the athlete’s centre of mass. Jump height is best measured using the impulse-momentum data from a force platform (15, 17).
Other test variables such as those listed below may also be measured, but this requires special equipment such as a force platform. Therefore, these are not often measured in most environments. However, measuring those additional variables (e.g. impulse) provides a better picture of the athlete’s physical profile.
- Peak force (N)
- Relative peak force (N·kg-1)
- Peak power (W)
- Peak velocity (M·s-1)
- Rate of force development (N·s-1)
- Impulse (N·s)
In terms of measuring vertical jump performances, flight time is considered to be the most valid and reliable method for calculating jump height (17, 18). Flight time is simply the total duration the athlete spends in the air with no ground contact. Flight time does not start until the athlete loses contact with the floor, and ends the moment they reconnect with it.
The method for measuring jump height using various equipment is as follows:
Contact Mat – If a contact mat is being used, then fight time is typically the outcome measure. However, some contact mat systems may calculate jump height for you. If not, then the test administrator can calculate jump height from flight time data using either of the calculations below.
Jump Height = 9.81 * (flight time)2 / 8 (16, 19)
Or,
Jump Height = time2 * 122625 ( 17)
Force Platform – Those using a force platform are advised to calculate jump height using the following formula (20):
Jump Height = (initial velocity)² / (2 * acceleration due to gravity)
High-Speed Camera – When using a high-speed video camera and appropriate software, flight time is typically calculated via slow-motion analysis. From this, because the flight time has been obtained, jump height can then be calculated using the formulas above.
Accelerometer (linear position transducer) – Similar to the contact mats, accelerometers typically self-calculate jump height, peak power and peak velocity; meaning no additional work is needed.
Infrared platform (e.g. OptoJump) – This system calculates jump height by measuring flight time and then performing the abovementioned jump height formulas (16). Therefore, the test administrator is not required to perform any calculations.
IMPORTANT: One thing to remember which is essential when testing and comparing past and future results, is that different testing methods (e.g. force platforms or linear position transducers) produce very different scores (21). This is partly because the force platform calculates power using a force-time method, whereas the linear position transducer calculates it using a barbell displacement-time method.
How do you score the Squat Jump test?
Now you know what test apparatus you are using and how to calculate jump height, this next section is very straightforward. With a minimum of three jumps completed, and therefore three peak power scores, the best score can be used or an average relative peak power score can then be calculated. This is done by using the following equation:
Best score = Highest power output of the three jumps.
Average Relative Peak Power (W·kg-1) = (peak power #1 + peak power #2 + peak power #3) / total number of jumps (i.e. 3) / body weight (kg).
Considerations for using the Squat Jump test
When conducting the test, there are several factors that need to be taken into consideration before you begin. Some of which being:
- Individual effort – Sub-maximal efforts will result in inaccurate scores.
- Varying take-off and landing positions.
- Countermovement drop depth.
- Duration of pause if performing the static SJ.
- Flexing on the ankles, knees, or hips during flight.
Is the Squat Jump test valid and reliable?
The SJ has been shown to be a valid and reliable measure of lower-body explosive power (3). Moreover, this test has also been shown to be the second most reliable measure of lower-body power in comparison to other popular jump tests; such as the CMJ, Abalakov’s jump, Sargent jump, standing long jump, and the standing triple jump (3).
Though vertical jumping can be measured in reliability using all of the systems below, the force platform is still considered the ‘gold-standard’ apparatus for high levels of precision.
- Contact mats (18, 22-25)
- Force platforms (16, 18, 23, 26, 27)
- Infrared platforms (16, 28, 29)
- Accelerometers (linear position transducers) (25, 30)
- High-speed cameras with appropriate software (17, 18, 24, 27)
- Klavora, P. (2000). Vertical-jump Tests: A Critical Review. Strength and Conditioning Journal, 22(5), pp.70–75. http://journals.lww.com/nsca-scj/Citation/2000/10000/Vertical_jump_Tests__A_Critical_Review_.20.aspx
- Young, W. (1995). Laboratory strength assessment of athletes. New Study Athletics. 10, pp.88–96. https://www.google.com.au/url?sa=t&rct=j&q=&esrc=s&source=web&cd=1&cad=rja&uact=8&ved=0ahUKEwiYhZ-o9vTKAhXBHZQKHZEeBjsQFgghMAA&url=http%3A%2F%2Fwww.iaaf.org%2Fdownload%2Fdownloadnsa%3Ffilename%3D9daf7a4d-c52b-4956-8453-caa4b378606c.pdf%26urlslug%3Dlaboratory-strength-assessment-of-athletes&usg=AFQjCNGE-eqSfuiLyBpWgAAZuN_EbLPe6w&sig2=KCAAreIdfXSKcbFTC5uT8Q
- Markovic, G., D. Dizdar, I. Jukic, and M. Cardinale. Reliability and factorial validity of squat and countermovement jump tests. J. Strength Cond. Res. 18(3):551–555. 2004 http://www.ncbi.nlm.nih.gov/pubmed/15320660
- Haun C. (2015). An Investigation of the Relationship Between a Static Jump Protocol and Squat Strength: A Potential Protocol for Collegiate Strength and Explosive Athlete Monitoring. Unpublished Master’s Thesis. http://dc.etsu.edu/etd/2534/
- Morin JB, Samozino P. (2016). Interpreting Power-Force-Velocity Profiles for Individualized and Specific Training. International Journal of Sports Physiology and Performance, 11 p 267-272. https://www.ncbi.nlm.nih.gov/pubmed/26694658
- Docherty, D, Robbins, D, and Hodgson, M. (2004). Complex training revisited: A review of its current status as a viable training approach. Strength Cond J, 27(4), pp.50-55. https://www.researchgate.net/publication/232240805_Complex_Training_Revisited_A_Review_of_its_Current_Status_as_a_Viable_Training_Approach
- Abernethy P, Wilson G, Logan P. Strength and power assessment. Issues, controversies and challenges. Sports Med. 1995 Jun;19(6):401-17. http://www.ncbi.nlm.nih.gov/pubmed/7676101
- HARMAN, E. Strength and power: A definition of terms. Nat. Strength Cond. Assoc. J. 15:18–20. 1993.
- SALE, D.G. Testing strength and power. In: Physiological Testing of the High Performance Athlete. J.D. Mac Dougall, H.A. Wenger, and H.J. Green, eds. Champaign, IL: Human Kinetics, 1991. p. 21–106.
- Harris NK, Cronin JB, Hopkins WG, Hansen KT. Relationship between sprint times and the strength/power outputs of a machine squat jump. J Strength Cond Res. 2008 May;22(3):691-8. http://www.ncbi.nlm.nih.gov/pubmed/18438252
- McLellan, CP, Lovell, DI, and Gass, GC. The role of rate of force development on vertical jump performance. J Strength Cond Res 25(2): 379–385, 2011. http://www.ncbi.nlm.nih.gov/pubmed/20093963
- Doré E, Bedu M, Van Praagh E. Squat jump performance during growth in both sexes: comparison with cycling power. Res Q Exerc Sport. 2008 Dec;79(4):517-24. http://www.ncbi.nlm.nih.gov/pubmed/19177953
- Dal Pupo J, Detanico D, Giovana dos Santos S. Kinetic parameters as determinants of vertical jump performance. Brazilian Journal of Kineanthropometry & Human Performance;2012, Vol. 14 Issue 1, p41. [Link]
- Gheller RG, Pupo JD, de Lima LAP, de Moura BM, dos Santos SG. (2014). Effect of squat depth on performance and biomechanical parameters of countermovement vertical jump. Brazilian Journal of Kinanthropometry, 16:6, 2014. https://periodicos.ufsc.br/index.php/rbcdh/article/view/1980-0037.2014v16n6p658
- Laffaye, G, Wagner, PP, and Tombleson, TIL. Countermovement jump height: Gender and sport-specific differences in the forcetime variables. J Strength Cond Res 28(4): 1096–1105, 2014 http://www.ncbi.nlm.nih.gov/pubmed/23838969
- Glatthorn, JF, Gouge, S, Nussbaumer, S, Stauffacher, S, Impellizzeri, FM, and Maffiuletti, NA. Validity and reliability of Optojump photoelectric cells for estimating vertical jump height. J Strength Cond Res 25: 556–560, 2011. http://www.ncbi.nlm.nih.gov/pubmed/20647944
- Balsalobre-Fernandez, C, Tejero-Gonza´ lez, CM, del Campo- Vecino, J, and Bavaresco, N. The concurrent validity and reliability of a low-cost, high-speed camera-based method for measuring the flight time of vertical jumps. J Strength Cond Res 28(2): 528–533, 2014 http://www.ncbi.nlm.nih.gov/pubmed/23689339
- Ache Dias, J, Dal Pupo, JD, Reis, DC, Borges, L, Santos, SG, Moro, ARP, and Borges Jr., NG. Validity of two methods for estimation of vertical jump height. J Strength Cond Res 25(7): 2034–2039, 2011 http://www.ncbi.nlm.nih.gov/pubmed/21701288
- Bosco, C, Luhtanen, P, and Komi, PV. A simple method for measurement of mechanical power in jumping. Eur J Appl Physiol Occup Physiol 50: 273–282, 1983. http://www.ncbi.nlm.nih.gov/pubmed/6681758
- Moir GL. Vertical Jump Height from Force Platform Data in Men and Women. Measurement in Physical Education and Exercise Science, 12: 207–218, 2008. http://www.tandfonline.com/doi/pdf/10.1080/10913670802349766
- Hori N, Newton RU, Andrews WA, Kawamori N, McGuigan MR, Nosaka K. Comparison of four different methods to measure power output during the hang power clean and the weighted jump squat. J Strength Cond Res. 2007 May;21(2):314-20. http://www.ncbi.nlm.nih.gov/pubmed/17530989
- Caireallain, AO and Kenny, IC. Validation of an electronic jump mat. International Symposium on Biomechanics in Sports: Conference Proceedings Archive 28: 1–4, 2010. [Link]
- Enoksen, E, Tonnessen, E, and Shalfawi, S. Validity and reliability of the Newtest Powertimer 300-series testing system. J Sports Sci 27: 77–84, 2009. http://www.ncbi.nlm.nih.gov/pubmed/19031330
- Garcia-Lopez, J, Peleteiro, J, Rodgriguez-Marroyo, JA, Morante, JC, Herrero, JA, and Villa, JG. The validation of a new method that measures contact and flight times during vertical jump. Int J Sports Med 26: 294–302, 2005. http://www.ncbi.nlm.nih.gov/pubmed/15795814
- Nuzzo, JL, Anning, JH, and Scharfenberg, JM. The reliability of three devices used for measuring vertical jump height. J Strength Cond Res 25: 2580–2590, 2011. http://www.ncbi.nlm.nih.gov/pubmed/21804426
- Ferreira, LC, Schilling, BK, Weiss, LW, Fry, AC, and Chiu, LZF. Reach height and jump displacement: implications for standardization of reach determination. J Strength Cond Res 24(6): 1596– 1601, 2010 http://www.ncbi.nlm.nih.gov/pubmed/20508464
- Requena, B, Requena, F, Garcıa, I, de Villarreal, ESS, and Paasuke, M. Reliability and validity of a wireless microelectromechanicals based system (Keimove) for measuring vertical jumping performance. J Sports Sci Med 11: 115–122, 2012. http://www.ncbi.nlm.nih.gov/pmc/articles/PMC3737853/
- Bosquet, L, Berryman, N, and Dupuy, O. A comparison of 2 optical timing systems designed to measure flight time and contact time during jumping and hopping. J Strength Cond Res 23: 2660–2665, 2009. http://www.ncbi.nlm.nih.gov/pubmed/19910809
- Casartelli, N, Muller, R, and Maffiuletti, NA. Validity and reliability of the Myotest accelerometric system for the assessment of vertical jump height. J Strength Cond Res 24: 3186–3193, 2010. http://www.ncbi.nlm.nih.gov/pubmed/20940642
- Cronin, J.B., R.D. Hing, and P.J. McNair. Reliability and validity of a linear position transducer for measuring jump performance. J. Strength Cond. Res. 18(3):590–593. 2004 http://www.ncbi.nlm.nih.gov/pubmed/15320688